
A clean taper already looks sharp. Add a line, a part, or a small pattern, and it starts to look personal.
Taper designs are shaved details cut into the sides or back of a tapered haircut. Some are almost invisible. Others are bold enough to draw attention across a room. All of them rely on the same thing: a smooth taper that gives the design a clear canvas.
This guide explains what a taper design is, walks through 12 designs worth trying, and shows you how to ask for them. You will also find upkeep schedules, placement tips, and common mistakes so you leave the barbershop happy.
🎨 What Is a Taper Design, Exactly?
A taper design is a line, shape, or pattern shaved into the short hair of a taper fade. Barbers usually cut it with a trimmer or a straight razor after the fade is blended. The skin or very short stubble shows through, so the design stands out against the longer hair around it.
Quick answer: a taper design is a shaved detail, such as a line, part, or pattern, added to a tapered haircut to create contrast and personality.
You may also hear these called hair tattoos, fade art, or line work. The terms overlap, and shops use them differently.
Design work has a long history in barbershop culture. Modern barbers treat the side of the head like a canvas, and social media has pushed the craft forward. A well-cut line can now be as recognizable as a signature.
Why Designs Work Best on a Taper
A taper changes length gradually. That gradient gives the barber a smooth surface to work on. The design then reads as a deliberate accent instead of a random cut.
Short sides also matter. The shorter the hair, the more clearly the pattern shows. That is why designs look strongest on a mid or low taper with tight sides.
The Main Types of Designs
| Type | What It Looks Like | Difficulty |
| Lines | Single or multiple straight cuts | Easy |
| Parts | A razor-defined split between sections | Easy to medium |
| Curves | Slashes and swoops | Medium |
| Shapes | Stars, crosses, triangles, steps | Medium to hard |
| Freestyle | Waves, swirls, and custom art | Hard |
What You Need Before You Start
Any design depends on the base haircut. Make sure your taper is fresh and your hair is dense enough to show contrast. Very thin hair can make line work look patchy. Your barber can tell you quickly whether your hairline and head shape suit the design you want.
✂️ The 12 Taper Fade Designs Worth Trying
Each design below includes what it looks like, who it suits, and what to ask for. Skill level matters, so choose a barber whose portfolio includes similar work.
1. The Single Hard Line
One clean, straight line is cut into the side of the head. It is the simplest and most popular design, and a great first step.
It suits almost any hair type and works with short or long tops. The line adds structure without overpowering the cut.
Ask for: A single straight line, placed above the temple or along the natural part.
Upkeep: Freshen every two weeks. Hair grows back quickly, so the line softens fast.
2. Double Parallel Lines
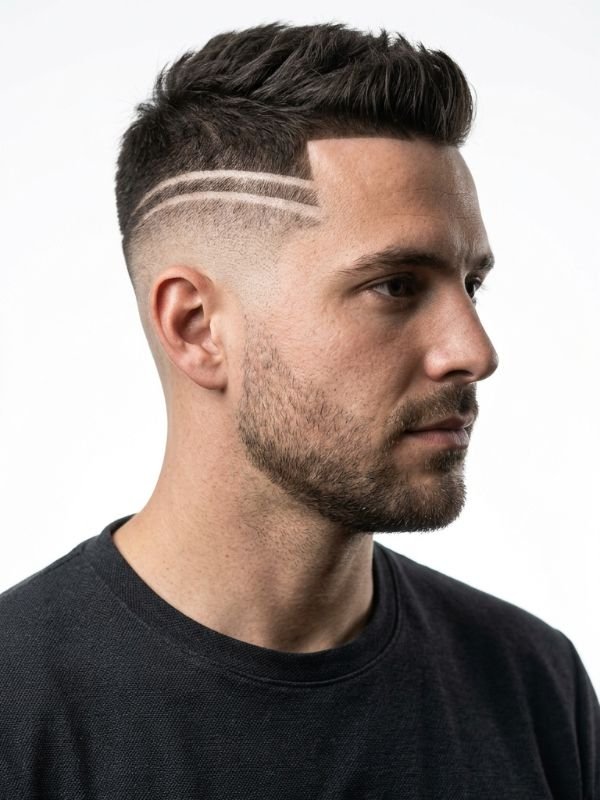
Two lines run side by side, usually near the temple or above the ear. The pair feels sporty and deliberate.
It works well with a short crop or a textured top. The spacing matters, so tell your barber how thick you want each line and how far apart.
Ask for: Two parallel lines of equal length, with a small gap between them.
Upkeep: Slightly more demanding than a single line, since both lines must stay even.
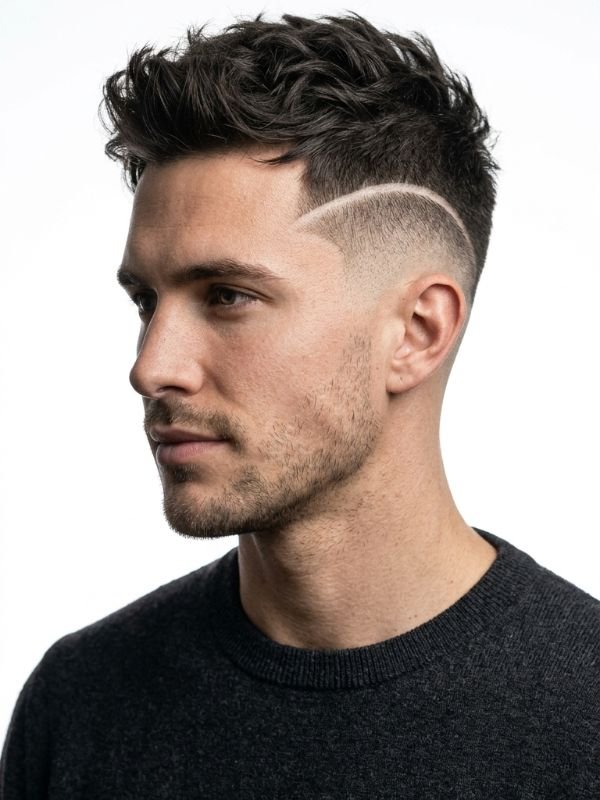
3. The Curved Slash
A curved cut follows the natural shape of the head. It looks softer than a straight line and feels more modern.
This design suits rounded heads and men who want a gentle accent. The curve should follow the flow of the taper rather than cut against it.
Ask for: A curved slash that follows the contour of the taper, ending before the ear.
Upkeep: Medium. Curves lose their smooth look when regrowth appears.
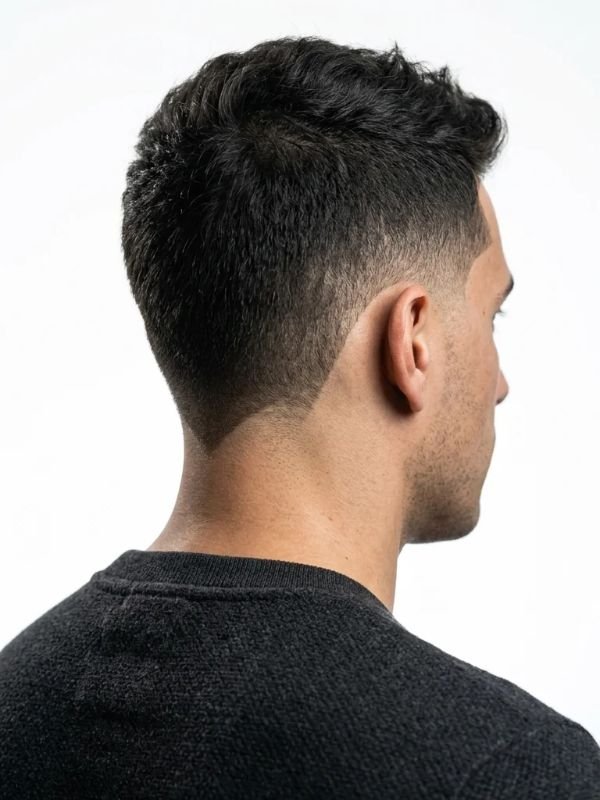
4. The V-Shape at the Back
A V is shaved at the nape, pointing down toward the neck. Most of the time, people only see it from behind, which makes it a subtle surprise.
It frames the neckline and works well with longer tops or tied-back hair. It is also a good way to try a design without a big front-facing change.
Ask for: A clean V at the nape, centered and symmetrical.
Upkeep: Medium. The neckline grows quickly, so book regular trims.
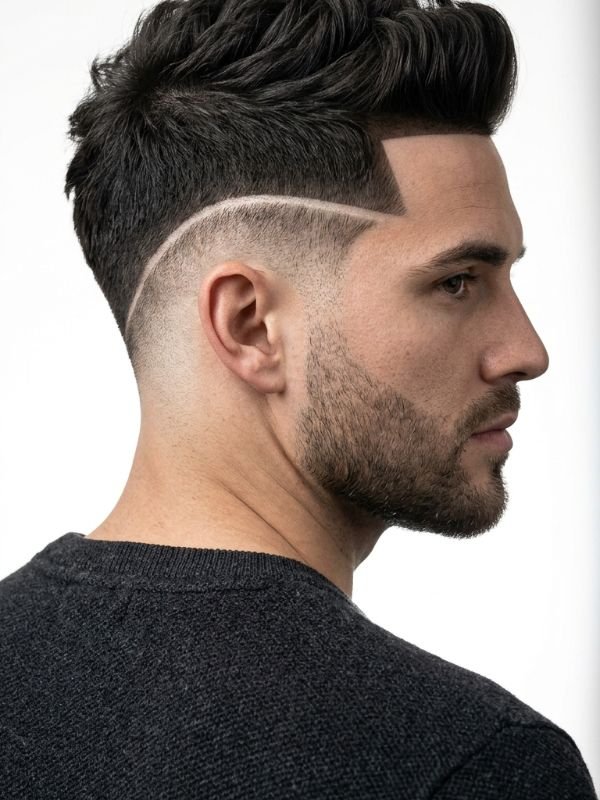
5. The Drop Line
A line starts at the temple and drops toward the ear or the back of the head. It echoes the shape of a drop fade and adds movement.
This design works best on a clean mid taper. The line should follow the same direction as the fade for a natural look.
Ask for: A drop line that follows the curve of the fade, starting at the temple.
Upkeep: Medium. A drop fade needs regular care to keep its contrast as hair grows.
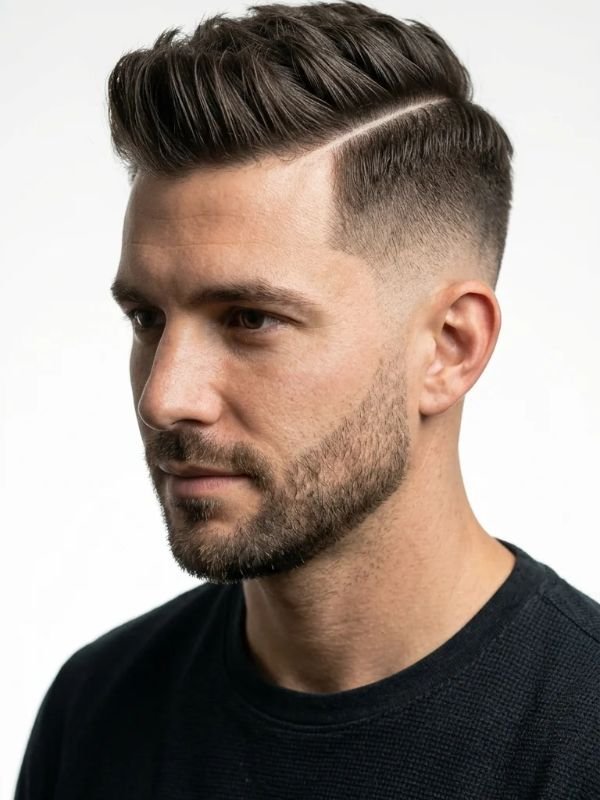
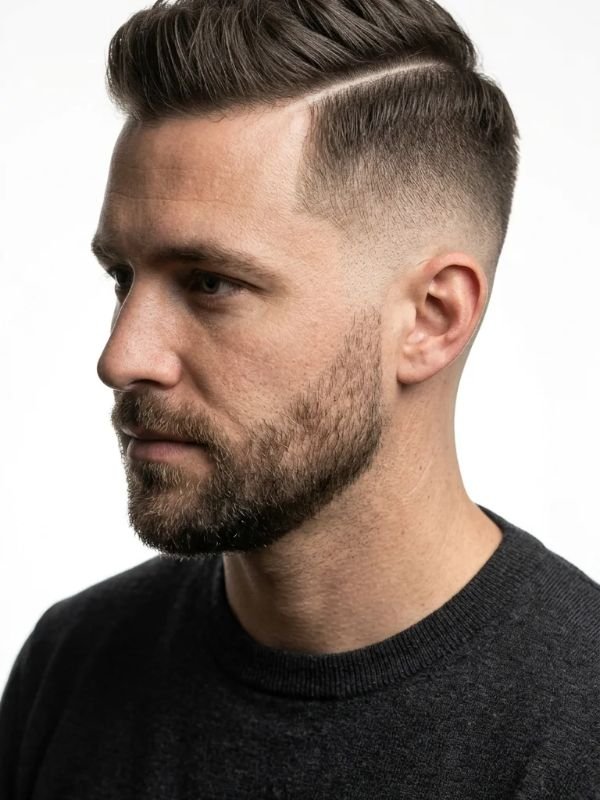
6. The Surgical Part (Razor Part)
A razor-defined part, also called a hard part, splits the top into two sections. The cut is made with a straight razor, which gives a crisp edge.
It suits almost any hair type and works well with a longer top and short sides. Men with strong hairlines can wear it subtly, while others prefer thicker or more decorative versions.
Keep in mind that hair begins to grow back within days. The part looks sharpest early on and usually needs a touch-up about every two weeks.
Ask for: A razor part on the left or right, placed with your natural hair direction in mind. Mention any cowlicks.
Upkeep: High. Plan for regular visits.
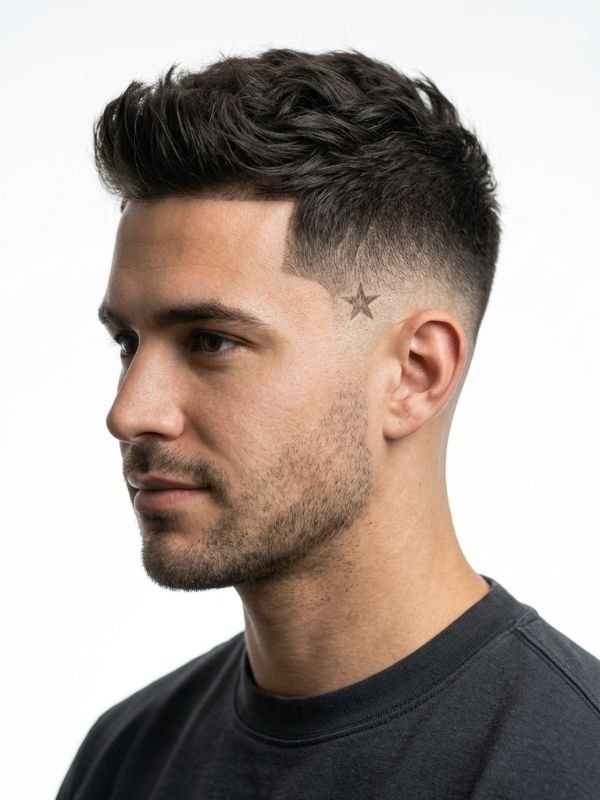
7. The Small Star or Cross
A small symbol is shaved above the ear or at the temple. Stars and crosses are the most common, though some men choose initials or simple icons.
Keep the shape small and clean. Intricate symbols blur quickly as hair grows, and they take a skilled barber to cut well.
Ask for: A small, clean shape in a specific spot, ideally with a printed reference image.
Upkeep: High. Symbols lose definition quickly.
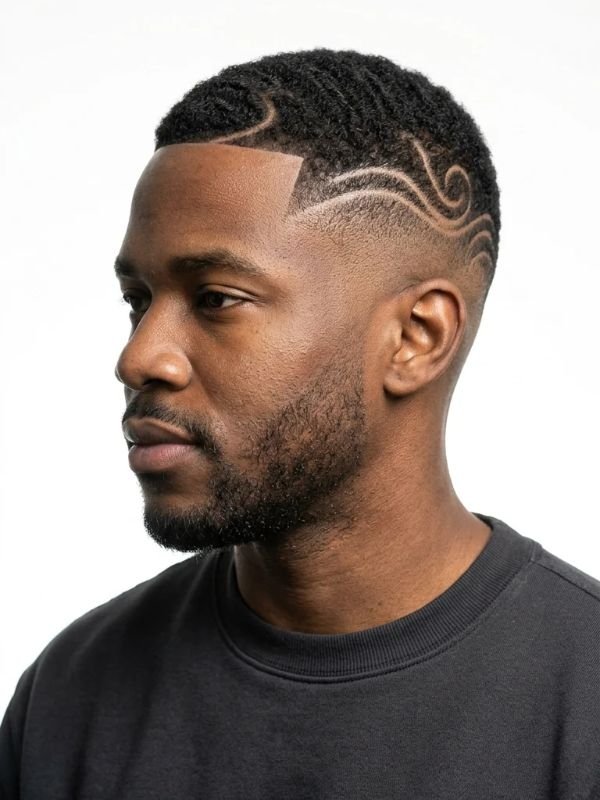
8. Freestyle Waves and Swirls
Flowing, wave-like shapes sweep across the side of the head. They look artistic and are different every time.
Freestyle work depends on the barber’s skill. Review their portfolio, and consider letting an experienced artist improvise within a theme you like.
Ask for: A flowing wave pattern, with your preferred size and placement.
Upkeep: High. Complex work grows out noticeably after a couple of weeks.
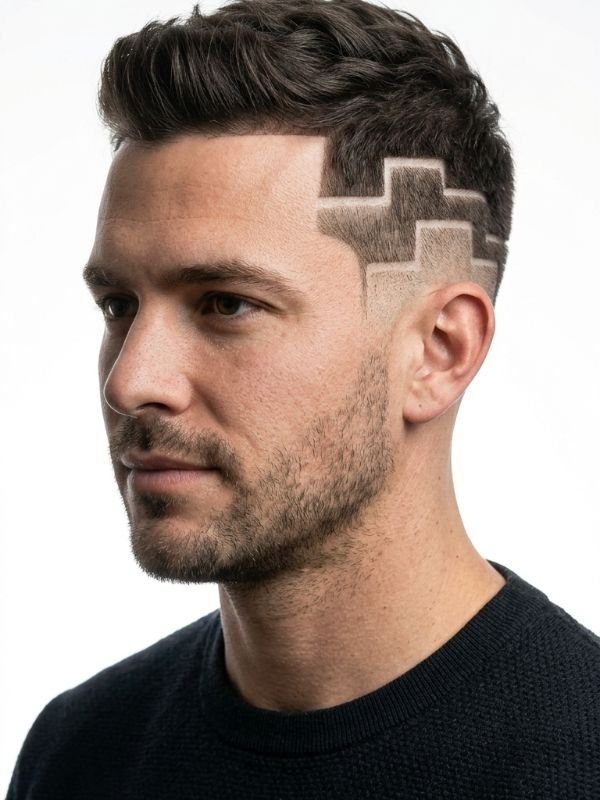
9. Geometric Steps
Stair-step lines, blocks, or triangles cut into the side create a sharp, architectural look. They suit short, tight tapers and bold personalities.
Geometric work is unforgiving. A wobbly line is obvious, so choose a barber with a steady hand and a strong portfolio.
Ask for: Stair steps of equal width, cut at a consistent angle.
Upkeep: High. Straight edges show regrowth quickly.
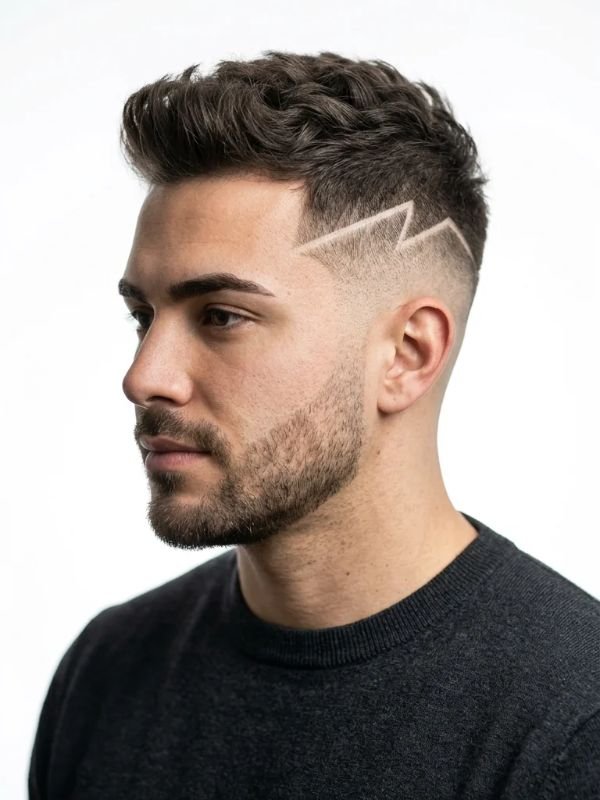
10. The Zigzag
A zigzag line, sometimes called a lightning pattern, adds energy to the side of the head. It is more playful than a straight line.
It looks best on a clean taper with enough contrast. Keep the zigzag small and even for a polished look.
Ask for: A narrow zigzag, with sharp angles and even spacing.
Upkeep: Medium to high.
11. The Hairline Corner Design
A small cut or notch is placed at the corner of the hairline, near the forehead or temple. It sharpens the frame of the face and can add definition.
It works well with a clean lineup. It can also draw attention away from a receding hairline, since the eye follows the design instead of the gap.
Ask for: A small notch at the corner of the hairline, matched to your lineup.
Upkeep: Medium. The edge needs trimming, since the forehead hairline grows quickly.
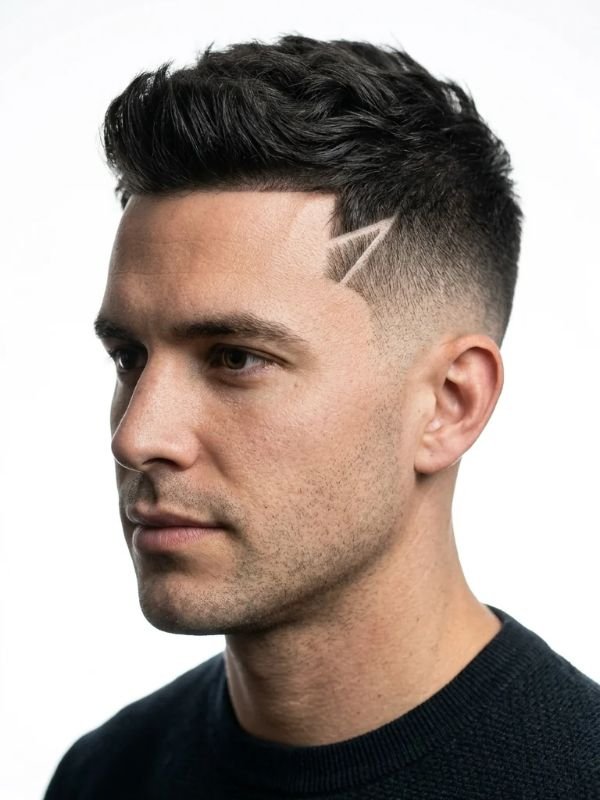
12. Low Taper Designs: The Subtle Set
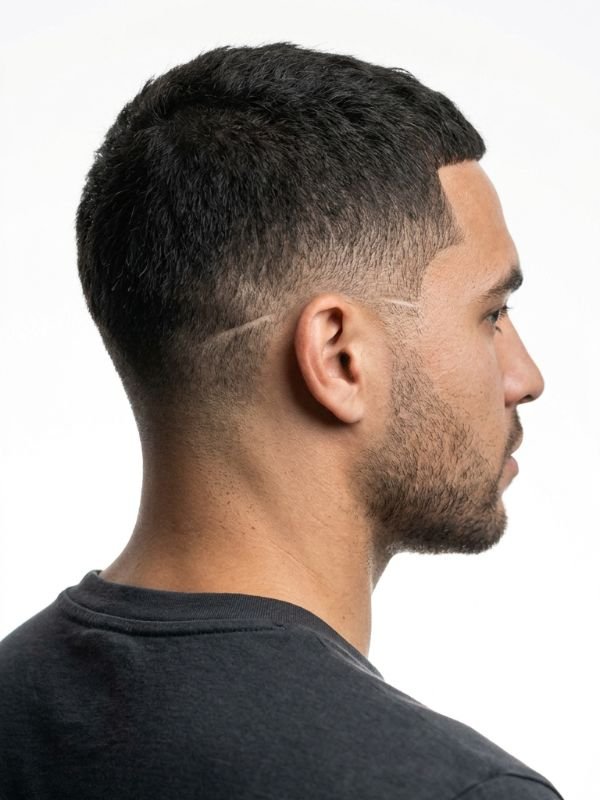
Not every design has to be loud. Low taper designs are small and quiet, placed near the ears and neckline.
Examples include a short line just above the ear, a tiny notch behind the ear, or a thin line along the nape. They suit workplaces with stricter grooming expectations.
Ask for: A minimal line or small detail on a low taper, kept subtle.
Upkeep: Low to medium. The softer look grows out gracefully.
Quick Comparison of All 12 Designs
| # | Design | Skill Needed | Upkeep | Best For |
| 1 | Single hard line | Low | Every 2 weeks | First-timers |
| 2 | Double lines | Low to medium | Every 2 weeks | Sporty looks |
| 3 | Curved slash | Medium | Every 2 to 3 weeks | Rounded heads |
| 4 | V at the back | Medium | Every 2 to 3 weeks | Subtle statements |
| 5 | Drop line | Medium | Every 2 to 3 weeks | Drop fade fans |
| 6 | Razor part | Medium | Every 2 weeks | Longer tops |
| 7 | Star or cross | High | Every 2 weeks | Personal symbols |
| 8 | Waves and swirls | High | Every 2 weeks | Artistic styles |
| 9 | Geometric steps | High | Every 2 weeks | Bold looks |
| 10 | Zigzag | Medium to high | Every 2 to 3 weeks | Playful looks |
| 11 | Hairline corner | Medium | Every 2 weeks | Sharp framing |
| 12 | Low taper designs | Low | Every 3 weeks | Workplaces |
Taper Designs by Hair Type
The same design behaves differently on different textures. A good barber adjusts the technique, but it helps to know what to expect.
| Hair Type | What Shows Best | What to Watch |
| Straight | Fine lines, parts, small symbols | Thin hair can make lines look faint |
| Wavy | Curved slashes, drop lines | Waves on top may cover the design |
| Curly | Hard parts, geometric steps | Shrinkage changes how the top frames the pattern |
| Coily or afro | Sharp lines, steps, bold shapes | Needs precise blending around the line work |
| Thick | Almost anything | Dense hair needs a tight taper so the design reads |
| Fine or thin | Single lines, subtle details | Complex patterns can look patchy |
Dense, dark hair gives the strongest contrast, so designs read clearly. Lighter or thinner hair still works, but keep the pattern simple and bold. Fine detail may disappear against the skin.
Pros and Cons of Taper Designs
Designs are fun, but they are not for everyone. Weigh the trade-offs before you commit.
| Pros | Cons |
| Adds personality to a clean haircut | Needs touch-ups every 2 to 4 weeks |
| Works with many base fades | Costs more than a plain taper |
| Can frame the face and hairline | Complex work needs a skilled barber |
| Easy to change from cut to cut | Mistakes are visible until hair regrows |
| Can distract from a receding hairline | May clash with strict dress codes |
The good news is that hair grows back. If you dislike a design, the next cut gives you a fresh start. That makes it one of the lower-risk ways to experiment with your look.
Best Base Cuts to Pair with Taper Designs
The design is only half of the picture. The haircut on top and around it decides how the whole look feels.
- Mid taper with a textured top. The most balanced pairing. The taper shows the design, and the top stays easy to style.
- Low taper with a fringe. A softer base for subtle designs near the ears and neckline.
- High taper with a flat top. A bold base that suits geometric patterns.
- Taper with a quiff or pompadour. Great for razor parts and sharp lines, since the top adds drama.
- Curly top with a taper. Defined curls sit well above a crisp line or hard part.
- Buzz cut with a taper. A minimalist base where one clean line carries the look.
Pick a base cut you already enjoy. A design will not rescue a haircut that does not suit you.
How to Choose the Right Taper Design
Picking a design is not only about taste. A few practical factors decide how well it works.
- Hair density. Thick hair shows contrast clearly. Fine or thin hair can make lines look faint.
- Head shape. Curves and symmetric designs flatter rounded heads. Angular designs suit flatter shapes.
- Workplace rules. Subtle designs are safer for conservative offices.
- Maintenance time. Complex designs need frequent visits.
- Barber skill. Some designs are easy. Others need an experienced artist.
Design Placement Guide
| Placement | Visibility | Good For |
| Above the temple | High | Lines, parts, small symbols |
| Above the ear | Medium | Stars, double lines |
| Behind the ear | Low | Subtle details |
| Nape | Low from the front | V-shapes, neckline art |
| Hairline corner | Medium | Frame definition |
How to Ask Your Barber for a Taper Design
Clear communication prevents most disappointments. Follow these steps before you sit down.
- Bring reference photos. Pictures show exact shape, size, and placement.
- Describe the base cut. Say what kind of taper you want and where it starts.
- Name the design. Use simple terms such as “single line” or “razor part.”
- Show the placement. Point to the spot on your own head.
- Mention thickness. A thin line looks very different from a thick one.
- Ask about upkeep. Find out how often to return.
- Review before the finish. Check the design in the mirror before the barber puts the clippers down.
A sample script:
“I’d like a mid taper with a single thin line above my left temple, about two inches long. Here’s a photo. Please keep it subtle, and let me know how often I’ll need to refresh it.”
If you trust your barber, you can also let them improvise. Many artists enjoy creative freedom, and the results can surprise you.
How Much Do Taper Designs Cost?
Prices vary by city, barber, and complexity. A basic fade often costs about $30 to $40 in many US shops, and designs usually add to that. Simple lines may add a few dollars, while detailed art can add much more.
| Design Level | Typical Add-On |
| Simple line or part | $5 to $15 |
| Medium design | $10 to $25 |
| Detailed freestyle art | $20 and up |
These are rough estimates, so confirm pricing before the barber starts. A standard tip is 15 to 20 percent of the total, and complex work often deserves the higher end.
How to Maintain a Taper Design
Designs need more upkeep than a plain taper. Razored lines grow out quickly, and detail is the first thing to fade.
Visit Schedule
Plan touch-ups about every two to four weeks, depending on your hair growth. Razor parts and detailed designs usually need the shorter end of that range. A fade tends to look freshest for only a few days before regrowth shows.
How Long Each Design Stays Sharp
| Design Type | Looks Best For | Needs a Refresh By |
| Single line or razor part | About 3 to 7 days | 2 weeks |
| Curves and zigzags | About 5 to 10 days | 2 to 3 weeks |
| Symbols and geometric work | About 5 to 7 days | 2 weeks |
| Freestyle art | About 7 to 10 days | 2 to 3 weeks |
| Subtle low taper details | About 10 to 14 days | 3 weeks |
These windows are estimates. Fast-growing, dense hair loses definition sooner, so adjust the schedule to your own growth. If you have an event coming up, book your visit one to two days beforehand for the sharpest result.
Between Appointments
- Tidy the neckline and ears. Stray hair around the fade can make a good design look messy.
- Clean up lightly. A regular razor can clean small areas, but stay clear of the design lines.
- Leave detail to the barber. Fixing a shape at home risks smudging it.
- Moisturize the skin. Freshly shaved areas can feel dry or irritated.
- Use styling product on top. Pomade or paste keeps the top neat and makes the sides pop.
Read Also This: 8 Best Mid Taper Fade Afro Styles for Men (2026)
Care for Sensitive Skin
Closely shaved areas can get red or bumpy. If you notice irritation, avoid scratching and use a gentle moisturizer. Persistent problems are worth showing to a dermatologist.
Common Mistakes to Avoid with Taper Designs
- Choosing a design that is too complex. Intricate shapes blur fast and cost more to maintain.
- Skipping the consultation. Two minutes of talking saves weeks of regret.
- Picking the wrong barber. Check portfolios for similar work first.
- Ignoring your hair direction. Cowlicks and growth patterns can distort a part or line.
- Forgetting dress codes. Some schools and workplaces restrict visible patterns.
- Waiting too long between cuts. A design loses its edge once regrowth appears.
- Trying advanced designs at home. Line work is hard to correct once cut.
Conclusion
Taper designs turn a clean haircut into something that feels like yours. Whether you pick a single hard line, a razor part, or a subtle low taper detail, the key is matching the design to your hair, your lifestyle, and your barber’s skill.
Start simple. A single line or a small hairline detail gives you a feel for the upkeep before you try more complex patterns. Bring photos, explain placement clearly, and ask how often to return. With a fresh taper, a thoughtful design, and regular maintenance, your haircut will keep looking sharp from the first day to the last.
