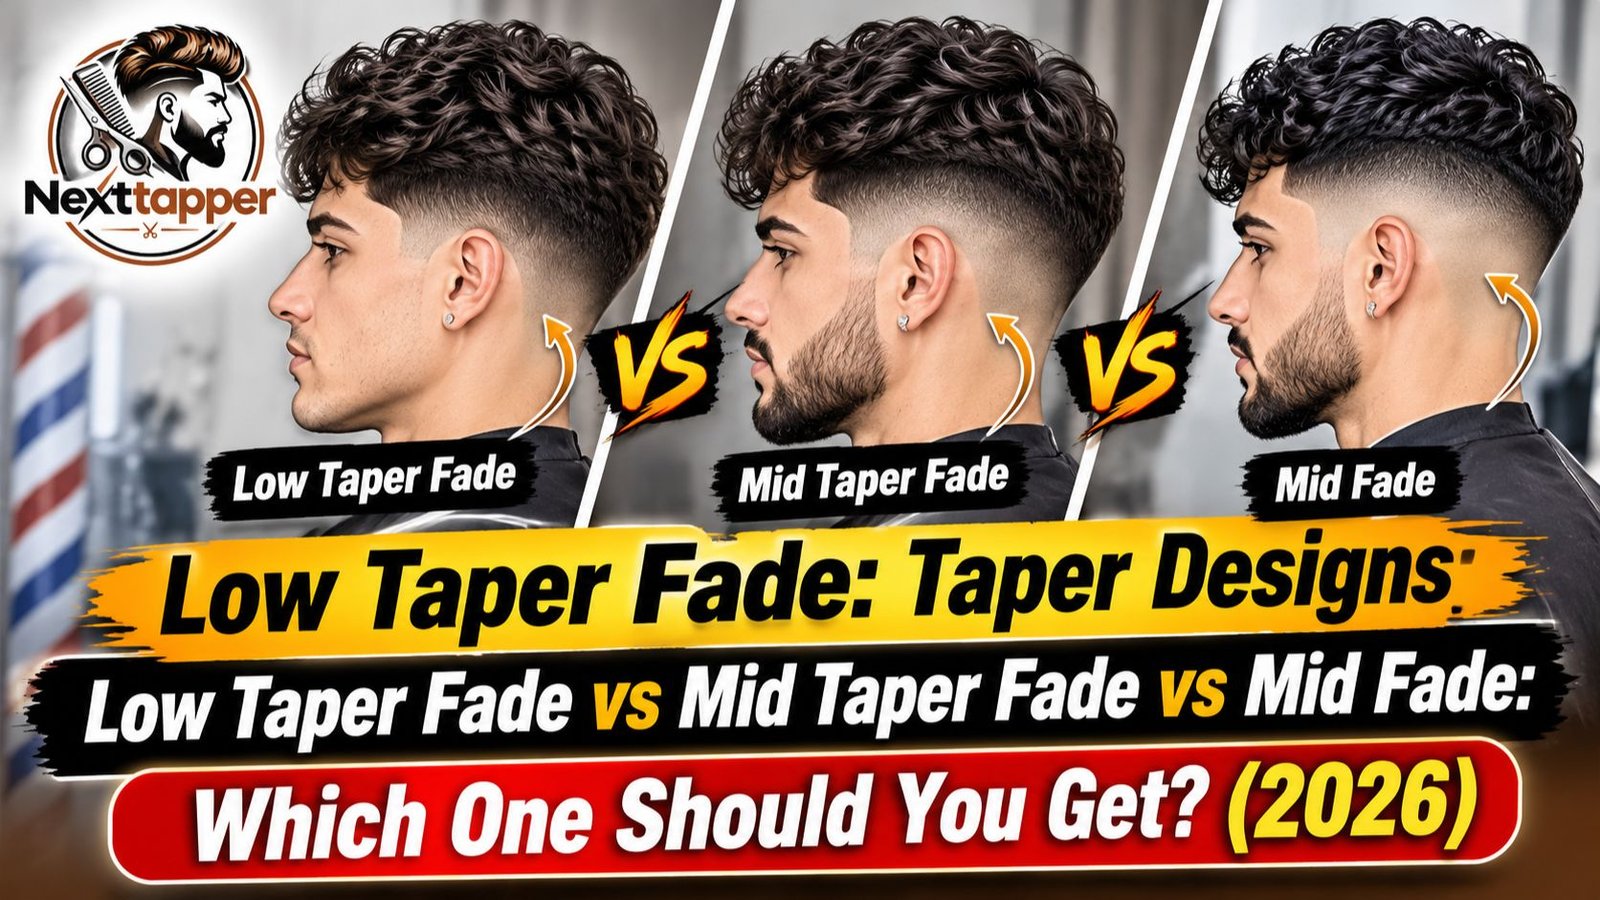

Three similar names cause one common problem. People walk into a barbershop, ask for a taper fade, and walk out with something they didn’t picture. The low taper fade, mid taper fade, and mid fade blur together because shops and customers use these words loosely.
This guide sorts them out. You’ll see what each cut looks like, where the blend starts, how short the bottom gets, how often you’ll need a trim, and which option suits your hair type and face shape. By the end, you should be able to describe the cut you want in terms any barber understands.
What Is a Low Taper Fade?
A low taper fade is a cut where the shorter hair starts low on the head, around the lower ear and sideburn area, and runs down toward the back of the neck. Everything above that blend line keeps its length, so the sides look fuller and the overall shape feels relaxed.
The word “taper” is the key. A taper shortens hair gradually, and in the classic version the bottom stays at a short, neat length instead of bare skin. A barber can take it closer to the skin if you ask, but most low tapers finish with a little hair at the neckline.
Because the blend sits low, the contrast is soft. There’s no sharp horizontal break between the top and the sides, so the cut suits offices, classrooms, and any setting where a quiet look fits. It also hides small irregularities well.
The low taper grows out gracefully. New growth blends into the existing length, so the cut rarely looks neglected in the first few weeks. Many people manage three to four weeks between visits before the shape starts to slip.

What Is a Mid Taper Fade?
A mid taper fade raises the blend line. The shorter section starts around temple level, or roughly where the top of the ear sits, so more of the side gets shortened. The bottom still finishes at a short length rather than skin, which keeps it in the taper family.
Raising the blend line removes more bulk from the sides. That shifts visual weight toward the top and tightens the silhouette when you look at the head from the front or side. The transition is also easier to see, so the cut has more definition than a low taper without the severity of a full skin fade.
Many barbers recommend the mid taper as a safe middle ground for people who can’t decide. It works with a range of textures and styles, from a clean side part to a short quiff. Plan on a visit every two to three weeks, because the higher blend line shows regrowth sooner.

What Is a Mid Fade?
A mid fade starts its blend at mid height, much like a mid taper, but it goes further at the bottom. The hair is taken down to a short buzz or to the skin. The main difference is the finish, not the starting point.
This is where naming gets messy. In some shops, “mid fade” means a skin-level blend that starts mid-height. In others, the phrase covers any fade that begins at that height. Because the name alone is unreliable, describe the bottom: “down to skin,” “a short buzz,” or a specific guard. We’ll come back to this when we cover asking your barber.
The mid fade is the boldest of the three. Its contrast draws the eye to the sides, which reads as sharp and current. The trade-off is upkeep. Lines stand out against a longer top, so most people return every two to three weeks, sometimes sooner if they like a crisp neckline.
Why This Comparison Matters in 2026
Fade terminology has multiplied. Scroll through any feed or sit in any chair and you’ll hear low, mid, high, skin, bald, burst, and drop fades, along with tapers that look almost identical. Many people use “taper” and “fade” interchangeably, and that habit is where a lot of disappointing haircuts begin.
Many customers now arrive with reference photos, and a photo only helps if you and your barber mean the same thing by the words you use. Naming the starting point and the finish closes that gap.
Upkeep deserves more weight than most people give it. The sharpest fade is the one you can maintain. If you can only manage a trim once a month, a low taper will serve you better than a mid fade that needs tidying every two weeks. Your schedule, budget, and hair’s growth rate belong in the decision alongside style.
Quick Comparison Table
Here’s a side-by-side view. Use it as a quick reference, then read the sections below for detail.
| Feature | Low Taper Fade | Mid Taper Fade | Mid Fade |
| Where the blend starts | Lower ear and sideburn area | Temple level or top of the ear | Mid height, similar to a mid taper |
| Bottom finish | Short, neat length at the neckline | Short length, not bare skin | Short buzz or skin |
| Contrast | Soft and gradual | Moderate, with a visible break | High and sharp |
| Side length kept | Most | Less | Least |
| Typical visit interval | Every 3 to 4 weeks | Every 2 to 3 weeks | Every 2 to 3 weeks |
| Office-friendly | Very | Yes | Usually, depending on the finish |
| Best for | Subtle looks and longer grow-out | A balanced look with some shape | A bold, clean-lined look |
Low Taper Fade vs Mid Taper Fade
These two cuts differ mainly in height. Lowering the blend line keeps more hair on the sides, so the head looks fuller from the side view. Raising it removes side bulk and draws attention to the top.
Start with what you want the sides to do. If you like a full, relaxed shape that moves with your hair, the low taper is the better pick. If you want a neater outline and a top that stands out, the mid taper delivers that.
Forgiveness is another difference. A low taper handles small mistakes well, because the blend is spread across a larger area. A mid taper leaves less room for error. A few millimeters too high can make the sides look thin, and uneven density shows up quickly. This matters most if your sides grow out bulky. A low taper can leave that bulk in place, while a mid taper clears it.
Maintenance favors the low taper too. Its regrowth is less obvious, so you can wait longer. The higher blend line of the mid taper makes growth visible sooner, which shortens the schedule.
Mid Taper Fade vs Mid Fade
This pair shares a starting point but splits at the bottom. The mid taper leaves a short but visible length at the neckline and sideburns. The mid fade takes that section down to a buzz or to skin.
That one change affects everything else. The mid fade has stronger contrast, a crisper edge, and a sharper silhouette. Because it shows the scalp, the finish needs careful blending and a clean lineup. Any unevenness is easier to spot, so precision counts for more.
The mid taper is the softer, more adaptable choice. It fits a wider range of workplaces and most textures and styles. Its edges are less demanding, and it gives you more time between visits than a skin-level finish.
To decide, ask how much you want the cut to show. For a relaxed, professional look, lean toward the mid taper. For a clean, bold line, the mid fade is the better pick, but only if you’re ready for the upkeep.
Low Taper Fade vs Mid Fade
This comparison puts the most subtle cut beside the most visible one. The low taper sits low on the head and keeps the most hair. The mid fade sits higher and has the most contrast.
At a glance, they look very different. The low taper almost melts into the rest of the haircut, while the mid fade draws a line across the sides that people notice. If you want a cut that reads as polished but low-key, the low taper fits. If you want the fade itself to be part of the look, the mid fade does that job.
Practical factors separate them too. The low taper suits formal settings and stays manageable between trims. The mid fade asks more of your barber and your calendar. Neither choice is wrong, but each requires a different commitment.
One detail catches people out. A low fade taken down to skin is a different cut from a low taper, even though the names sound alike. Clarify the finish, not just the starting point, every time you book.
How to Choose Based on Hair Type
Hair type changes how a fade looks and how quickly it grows out. The same blend can look crisp on one head and blocky on another, so think through your texture before you choose.
Straight Hair
Straight hair is the most predictable to cut. Lines show clearly, and the blend sits exactly where your barber places it. All three cuts work here. A low taper suits fine straight hair because it keeps a little more length at the sides. A mid taper can work too, but if the blend climbs too high on fine hair, the sides may look thin. A mid fade shows off straight hair’s clean lines, and regrowth appears as a neat edge that’s quick to tidy.

Curly Hair
Curls change the rules. Curly hair shrinks after cutting, so a length that looks right when wet can end up much shorter once it dries. Barbers usually leave more length on top and use longer guard sizes to allow for that.
Tight curls can carry any of the three cuts, depending on how the top is shaped. Looser curls often look best with a medium-length taper rather than a very short finish. The mid taper is a frequent choice for thick, coarse, or curly hair that grows outward at the temples, because it removes the bulk that builds there. Ask your barber to show you how the top looks dry, not just wet, before you commit.

Thick Hair
Thick hair makes the transition more dramatic because there’s more volume to remove. That’s useful if you want a clear shape, but it means placement counts. Thick hair that builds up quickly at the sides often looks better with a mid taper, since that blend clears bulk higher up. If your hair is thick but grows slowly, a low taper can keep the sides balanced without a severe transition.
Thick hair also affects upkeep. Dense hair can look wider between visits, so book a little sooner than you would with fine hair.

How to Choose Based on Face Shape
Face shape gives you a starting point, not a verdict. Barbers disagree about some of these pairings, so treat the advice below as a guide and check the result in a mirror, ideally with your barber’s input.
The core idea is simple. A higher blend draws the eye upward and adds a sense of height. A lower blend keeps more width at the sides and softens the jaw. Once you know which effect you want, the face shape choices make more sense.
Round or Square Face
Round faces often benefit from a higher blend. The vertical line adds a sense of length, and a mid taper with a little height on top helps balance the roundness. A low taper keeps width near the ears, which can make a round face look wider.
Square faces have strong jaw lines. A low taper keeps the lower sides softer, so the jaw doesn’t look overemphasized. A mid taper can also work well, especially if the top has some shape. Ask your barber which blend keeps the outline balanced.
Long or Oval Face
Long faces need caution with height. A high blend under a tall top can make the face look even longer, so these faces usually do best with a low taper that keeps the sides full and the top moderate. A mid taper can still work, but keep the top length in check. Oval faces are the most balanced shape, so most of these cuts suit them. Let hair type and personal style guide you.

Heart or Diamond Face
Heart faces are wider at the forehead and temples and narrower at the chin. Diamond faces are widest at the cheekbones and narrower at the forehead and jaw. Both shapes benefit from balance. Keeping some fullness near the jaw helps, which is why a low taper is often worth trying first. A mid taper can help when the temples look too wide, since it removes bulk in that area. Test both in a mirror with your barber, because the right answer depends on your proportions.

How to Ask Your Barber
Most disappointing fades come from a gap between what the customer pictured and what the barber heard. A few specific details close that gap. Use this order when you book or sit down.
- Bring photos. Show the front, side, and back if you can. Pictures taken in similar lighting work best.
- Name the starting point with a landmark. Say “start at the bottom of my ear,” “start at my temples,” or “start at the top of my ear.” Landmarks are easier to agree on than measurements.
- Describe the bottom finish. Say “taper to a short length at the neckline,” “take it down to skin,” or name a guard. Guard numbers describe the length left behind: a #1 leaves about an eighth of an inch, a #2 about a quarter inch, and a #4 about half an inch.
- Give the top length in inches, and describe how you usually style it.
- Decide on the neckline and sideburns. Choose rounded, tapered, or squared, and say which you want.
- Ask how it will grow out. Find out when you should book again and what you can tidy at home.
- Check the back before you leave. Ask for a hand mirror and look at both sides and the nape.
A sample request that covers the basics: “I’d like a mid taper. Start the blend at about the top of my ear, taper down to a #2 at the neck, keep about two inches on top, and square up the sideburns.”
Video Guide
A short video can show what a photo can’t: how the blend line moves as the head turns, and how the barber works the clippers. Watching a tutorial before your appointment helps you learn the vocabulary and spot details that count.
When you watch, look for:
- Side-profile shots that show exactly where the blend starts relative to the ear and temple.
- Slow clipper work, so you can see how the guard moves upward and how each transition is blended.
- Close-ups of the neckline and sideburns, since clean edges often make or break the final look.
- Back views that show whether the fade is even on both sides.
Choose videos with natural lighting and no heavy filters, because filters can hide the real shape of the blend. Pay attention to hair type too. A demonstration on straight hair won’t tell you how a fade looks on tight curls. Pause at the point where the shorter hair begins, then compare it with where your own ear and temple sit in the mirror. That quick check tells you more than the video title does.
Common Mistakes to Avoid
Most fade regrets come from a handful of avoidable errors. Watch for these before your next appointment.
- Choosing by name alone. Shops use these terms differently, so the starting point and finish matter more than the label.
- Setting the blend too high for the top. A high transition under a short top can look disconnected, while a long top with a low blend can look unbalanced. The two should work together.
- Skipping the neckline and sideburns. Shaggy edges make even a well-cut fade look neglected. A quick tidy between full visits keeps the shape sharp.
- Waiting too long between visits. Regrowth flattens the contrast, and higher blends show it sooner. Book the next appointment before you leave.
- Taking too much off at once. Start a little longer than you think you need. You can always take more off next time, but you can’t add length back.
- Ignoring density and growth rate. Thick, fast-growing hair needs more frequent visits than fine, slow-growing hair.
- Using heavy product on a skin-level finish. Thick products build up, flake, and show against the scalp. Choose lighter formulas for skin fades.
- Letting the back get missed. The nape is where many fades go wrong. Check it before you pay.
Read Also This: 17 Best Mid Taper Fade Curly Hair Styles (2026)
How to Maintain Each Style
Every fade needs upkeep, but the schedule and routine differ. Use these guidelines to set your rhythm.
Low Taper Fade
Plan on a full visit every three to four weeks. Between cuts, keep the neckline and sideburns clean, since the low blend depends on them. A weekly wash with a mild shampoo keeps the sides fresh, and a light conditioner on the longer top helps it sit well. If you own a trimmer, you can tidy the neckline at home, but leave the blend itself to your barber.
Mid Taper Fade
Book a visit every two to three weeks, since the higher blend line shows growth sooner. Clean up the neckline and sideburns between visits, and check the blend in a mirror once a week. A matte cream or light clay on top keeps the look neat without weighing it down. If the top tends to look dry, a little leave-in conditioner before styling helps.
Mid Fade
Expect a visit every two to three weeks, and sooner if the finish is down to skin. Skin-level finishes need extra care. Apply sunscreen to the scalp when you’re outdoors, moisturize lightly, and gently exfoliate once a week to prevent flakes. Use a small amount of product on the sides, because residue shows quickly against a clean line. Keep your hands out of the blend, since touching it spreads oil and can leave marks.
Heat and Product
Heat and product can make or break how a fade looks.
- Use a heat protectant before blow-drying or flat ironing, and keep the heat setting moderate.
- Match the product to the finish. A matte clay or paste gives control and texture. Pomade works for a slicked look, but use it sparingly.
- Wash with a clarifying shampoo weekly if you use product often. This clears buildup that can dull the blend.
- Keep the scalp comfortable. A light oil or balm helps dry, flaky skin around a skin-level finish.
- Diffuse curls rather than brushing them while wet, since brushing can disturb the shape.
Conclusion
Each of these cuts has a clear purpose. The low taper fade keeps things subtle, grows out gently, and suits conservative settings. The mid taper fade balances shape and softness, and it’s a sensible first choice if you’re unsure. The mid fade delivers bold contrast and a crisp line, provided you’re willing to keep up with the visits.
Start with your hair type and face shape, then weigh the practical side: your schedule, your budget, and the look you want to walk out with. When you book, describe the starting point and the finish, bring photos, and check the back before you leave.
If you’re still torn, a mid taper is a reasonable place to start. You can move the blend up or down next time and learn what suits you best.
